How to Use Streamlabs Stream Labels in XSplit Broadcaster
Last Updated on March 10, 2022 by Michael Brockbank
Ready to show off followers, donations, and subscribers using Stream Labels in XSplit Broadcaster? Using Streamlabs Stream Labels is a great way to add more oomph behind your live stream while acknowledging those who help grow the channel.
It’s all about showing your fans some love…even if it’s just a recent followers scrolling list.
In this tutorial, I’ll show you how to add Stream Labels to XSplit Broadcaster. It’s a quick and easy setup that’ll have you showing off your patrons in no time.

Setting Up Streamlabs Stream Labels for XSplit Broadcaster
I’m going to assume you already have XSplit Broadcaster and are ready to set up your labels. I’m also going to assume you have a Streamlabs account. If you don’t, I suggest you make one before continuing.
It’s free and loaded with all kinds of goodies for broadcasters.
Step 1: Install the Stream Labels App
Unfortunately, Streamlabs removed the Stream Labels feature from the account desktop. This is probably due to the fact that it’s an integrated feature of Streamlabs Prime and they want to promote it as such.
However, they still support it by accessing its download page directly.
Click the download button for your OS. At the time of this article, Stream Labels supports Windows, macOS, and Debian.

Your system will then download the install file. It shouldn’t take long as Stream Labels isn’t all that big of an application.
Once the program is downloaded, just install it as you would any other program.
Step 2: Connect to Streamlabs
Stream Labels uses basic text files updated in real-time. These files are saved on your computer and are how your streaming software collects data.
When you run Stream Labels, you’ll connect it to your Streamlabs account. On the first screen, sign in as you normally would with Streamlabs.
You’ll also need to assign an Output Directory. This is where the system saves the text files.
Before we can add Stream Labels to XSplit, we need to know the exact file to use.
Step 3: Find and Copy the Stream Labels File to Use
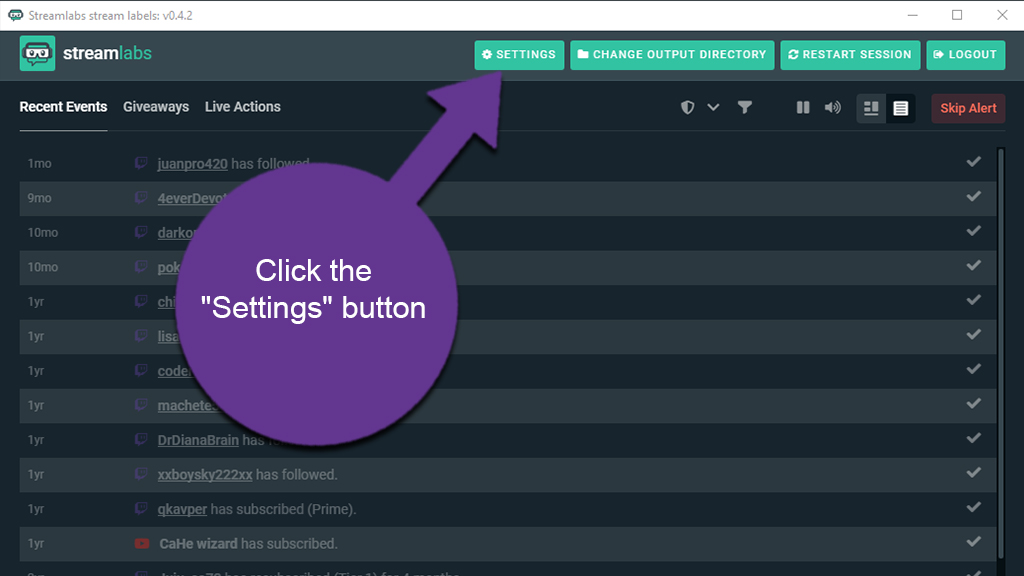
Launch the Stream Labels software and click the “Settings” button on the top toolbar.
Use the drop-down box to select the file you want to show. For instance, you would access “Session Followers” if you want to show the most recent followers of your channel.
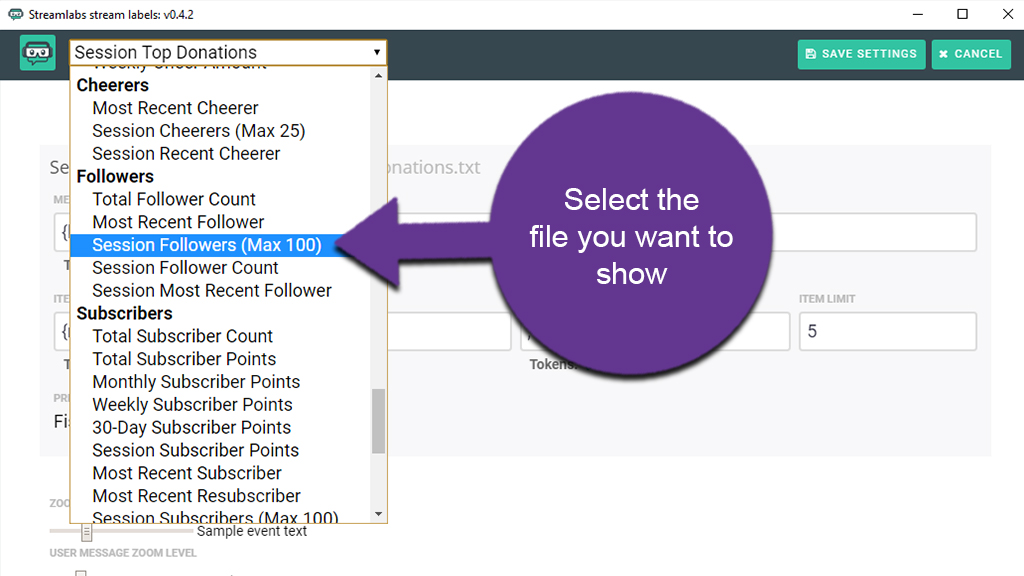
Stream Labels uses a lot of different data. You can show followers, donations, cheers, subscribers, and much more. It all depends on what you want to show on your broadcast.
For this tutorial, I’m simply going to create a session followers scrolling list.
Take note of the filename of the feed you want to put into XSplit Broadcaster. For instance, you can copy and paste the text into a Notepad file or other text document so you can remember.
Or, you can do what I did and just leave Streamlabs Stream Labels open. Either way, you’ll need this file to add into XSplit Broadcaster.
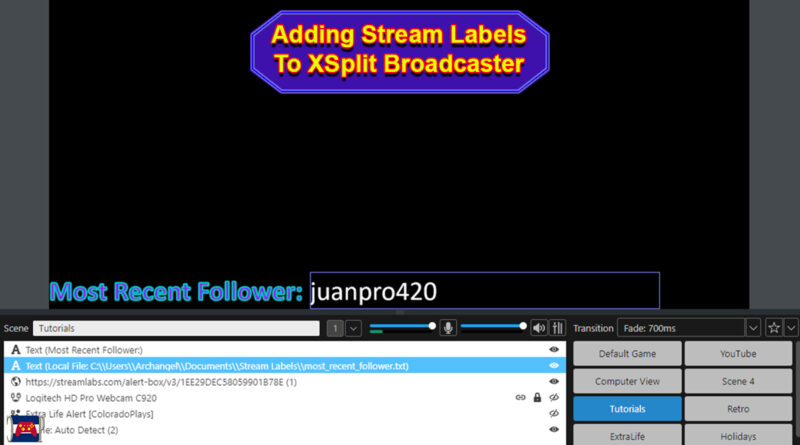
In this tutorial, I’m using “session_followers.txt.”

Make any adjustments in how you want the data to display. For instance, you can control how many recent followers are available, the separator character and if you want a text message to appear before the list.
In my example, I am just going to show the most recent “5” and I’m using a hyphen in between the names.
Click the “Save Settings” button on the top.

Now, we’re ready to add the label to XSplit.
Step 4: Add the Streamlabs Stream Labels to XSplit Broadcaster
From XSplit Broadcaster, go to Add Sources and click, “Text.”

By default, the text is going to be pretty big. You’ll have to make a few adjustments in the size, font and style you want to show. However, I’m going to do this later.
For now, let’s add the Stream Labels file.
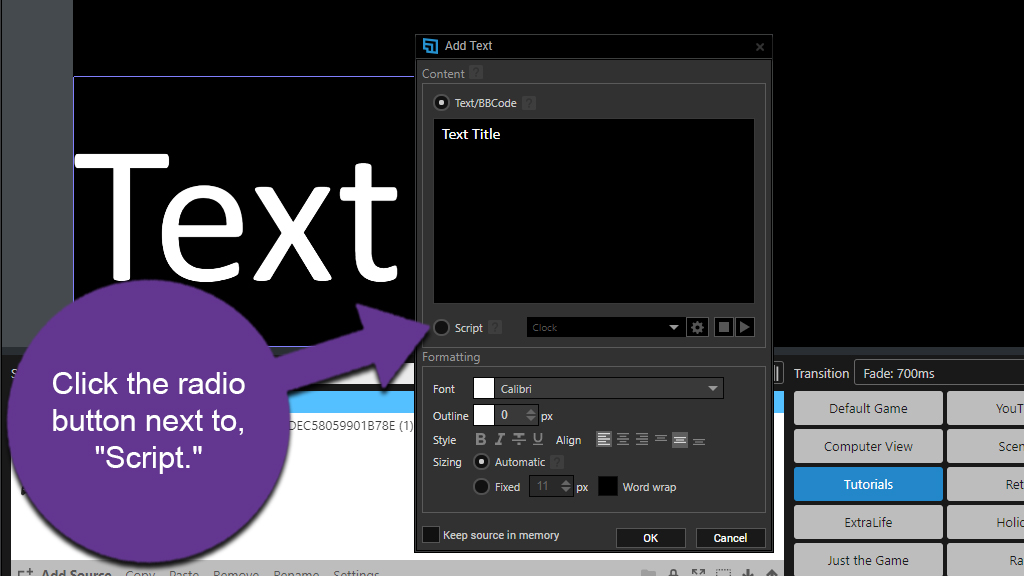
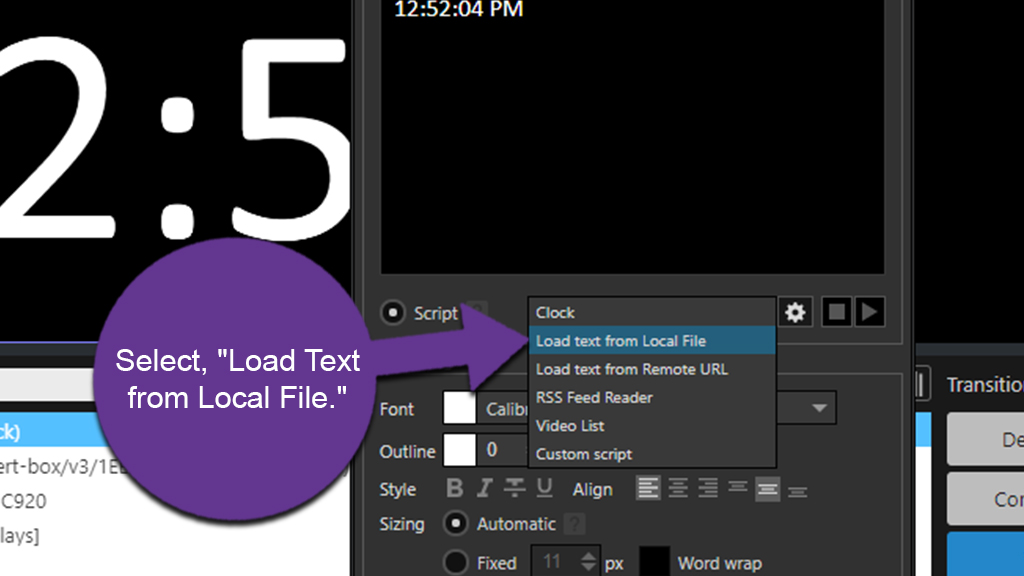
Click the radio button next to, “Script.”
XSplit has a few options you can use, including showing the time on your computer. This can be useful should you want to show timestamps during your live stream or videos.
Use the drop down box and select, “Load Text from Local File.”
Click the gear icon to open the file path screen.
This will open the Edit Script window for XSplit Broadcaster.
Click the elipses next to File Path to browse your computer.
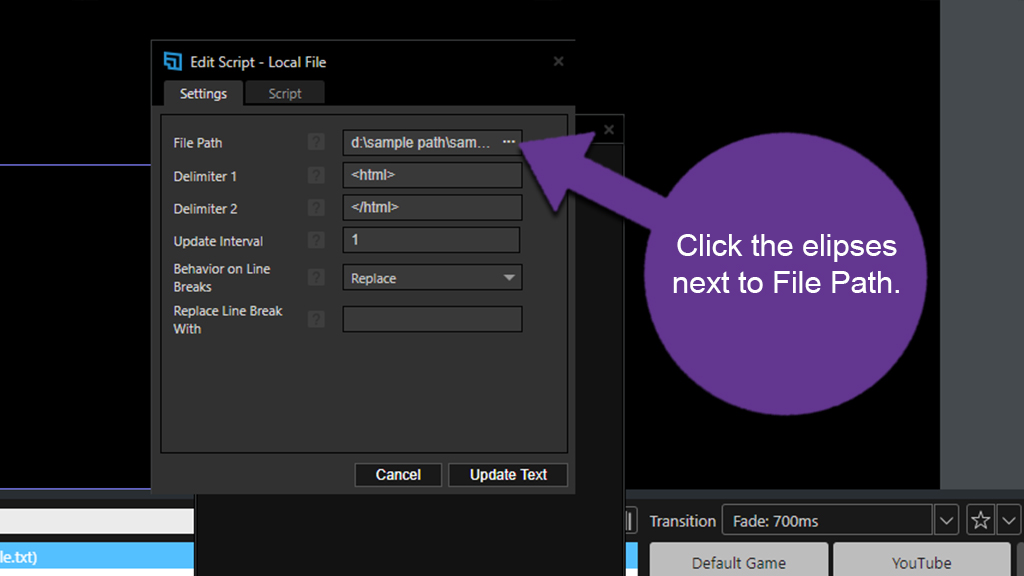
If you know the file path, you can also just type it in directly.
Find and add the file you want from Stream Labels. As you can see, mine are stored in the “Documents” folder. This will depend on where you have your files saved.
Click the “Update Text” button on the bottom.

From here, you can change the fromatting properties of the text to fit your needs. This includes things like the font, adding outlines to the text, alignment, bold, and more.

Once you’re done, just click anywhere off of the Text editor screen. Streamlabs Stream Labels will now show the text file in XSplit Broadcaster.
But what if you want to resize the text to fit your overlay or streaming needs?
Step 5: Resizing Streamlabs Stream Labels in XSplit
With the Text source selected in XSplit, grab the text box from the display panel along the top blue line. You do this by holding down the mouse click.

Drag it down to the size you want.
You can also drag it from the sides using the same method; grab the thin line on the side and move it where you want.
This lets you resize the text to fit perfectly in your design. For instance, what if you had a small background banner for the text? You could resize the information to fit great along the dimensions of that graphic.
Step 6: Fine Tune Your Settings
XSplit Broadcaster comes with an array of custom options for showing text. At any point you can right-click the text on the display or in the scene sources. This will open the text settings.

From this window, you can make all kinds of adjustments. You can change the color so the text appears easily over top of your game or other graphic. I personally like to change the font according to what game I like to play.
For instance, a scary scratch type of font looks great when playing something like Diablo or Phasmophobia. It gives it more of a “horror” appeal.
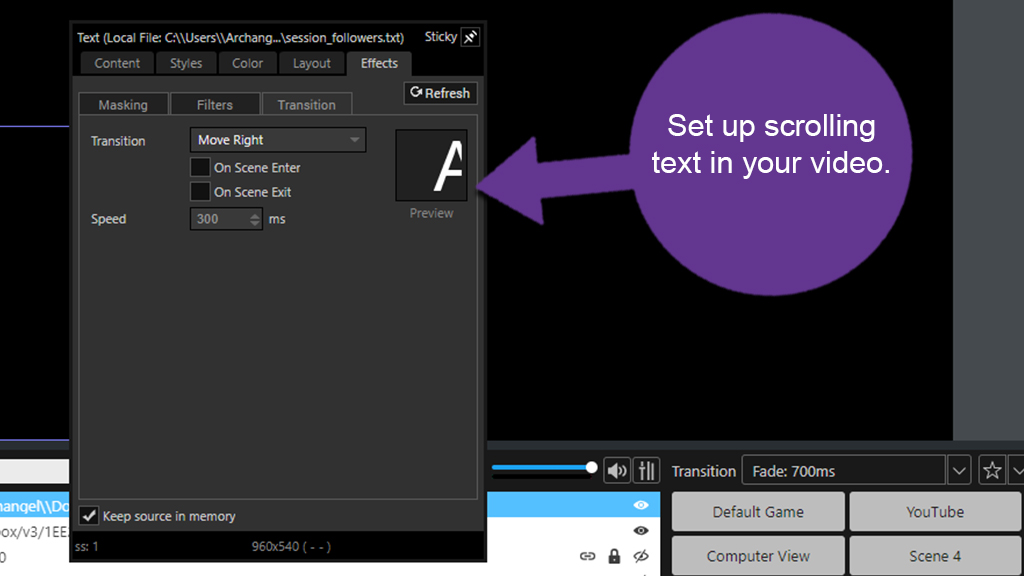
Another thing you might want to consider is the scrolling effect when adding Streamlabs Stream Labels to your live stream or video. This is especially true if you are using a text that has several entries, such as the top 5 donors.
To add a scrolling effect, click on the “Effects” tab and make your adjustments.
Spend time going over these settings and making the perfect adjustments for your stream. Since there’s quite a few things you can customize, you can really make your broadcast stand out.
Streamlabs Stream Labels comes with a myriad of different files you can use in your broadcast. Just add a text source in XSplit and link the proper text file.
Resetting the Stream Labels Display
One more thing I want to bring up is how to reset the text file. What if you just want to show your top donators for the day?
First of all, you would use the Session Donators text file.
When you want to start with a fresh list, click the “Restart Session” button in Streamlabs Stream Labels.

This will clear data from a lot of different files including recent followers, cheers and other types.
Add Life to Your Broadcast
Using stream labels in XSplit boosts the activity of your Twitch broadcast. It’s just one of those things that helps the engagement of your content. Now, you don’t need to add all of Stream Labels text files…that would probably be too much.
However, accentuating the live feed with info of your patrons could go a long way to acting like a call to action. It may inspire others to interact with your live feed.

- Extra Life 2024: Starting My 11th Year of Participation - February 6, 2024
- Review: Is the Sonicgrace Cooling Fan for the Oculus Any Good? - January 11, 2024
- Review: Is Premium Bowling Worth Buying for the Oculus? - February 10, 2023