How to Add and Record a Browser Window with OBS
The OBS platform offers a wide range of things you can add to a live stream or recording. Adding a browser window to show clips or websites can help you further engage an audience. So, how do you record a browser window in OBS?
Actually, there are a couple of different ways you can do this. And today, I’ll go over the different methods you can use.
Record a Browser Window in OBS
I’m going to assume you have the latest version of OBS and are ready to go. If not, you can always download it for free.
Let’s jump into three methods to record your browser window. Now, each one of these is going to have a very different end result. So, you’ll need to pick the best one that will suit your immediate needs.
Method #1: Window Capture to Record the Browser
Out of the different methods I use to show a browser window, using Window Capture is the most used. This is because it lets me show my screen during tutorials and when displaying website information.
Usually, I’ll have this set up without showing the bookmarks or address bar.
Add the Window Capture Source
With OBS open, click on the plus sign to add a new source.

Click the option to add a Window Capture.

Give the capture a new name. This is so you can easily find it in your Sources layout. For this tutorial, I’m simply going to call it “My Browser.”

The settings window for the source will open.
Modify the Settings for Your Needs
From here, you can select which window on your computer to display. Essentially, you can add anything that has a viewable source. Sometimes, OBS will default to the most recent window you used.
If you don’t see your browser here, click the Window drop-down to select the browser.

As you can see, OBS is showing the WordPress window of this article. That’s because I am taking screenshots as I write. Since it’s the most recent window I am using, OBS is capturing it.
Save Your Settings
Once you’re done, click “OK.”
This method works great for showing the entire window of any application you’re running on your computer. This means if you shrink the window size, it will also shrink in OBS.
I find this to be a great method if I want to zoom in on a specific website to show more details for viewers on YouTube.
Method #2: Monitor Capture to Record the Browser
What if you want to show a full-screen of something from your browser? Perhaps you want to use a full-screen clip from a movie to add something funny to a YouTube video or to otherwise accentuate the content.
You see this all the time when people record parts of movies, TV shows, news broadcasts, and more. Using OBS, you can clip the entire full-screen video to use in a variety of ways.
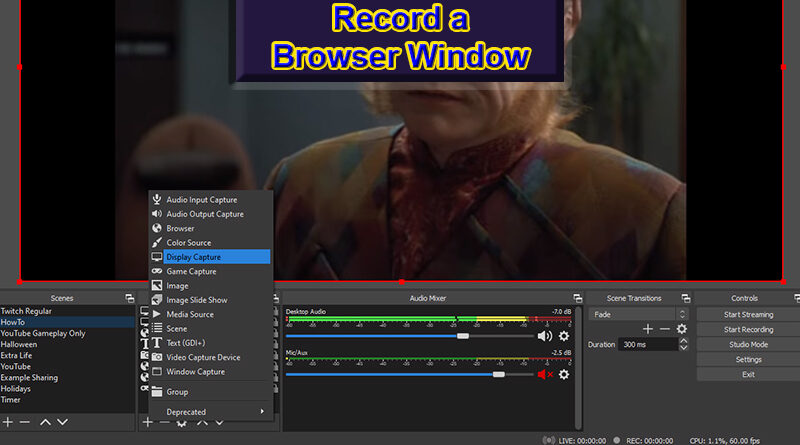
Add the Display Capture Source
Open the Source list in OBS.

This time, you want to select “Display Capture.”

Give your display a name. This way, you can find it easily among the OBS sources in your scene. In this case, I’m going to name it, “My Monitor.”

(Optional) Choose the Display You Want to Use
By default, OBS will show your primary monitor. If you only have one, then you’re done and can click, “OK” to save the source. But if you have other monitors, you can choose which display using the drop-down list.

This source will capture every single element from that particular monitor. This means that if you wanted to record video with OBS, you would just need to run it in a full-screen application and click the “Start Recording” button.

Save Your Settings
When recording streaming video, you want to:
- Make sure you run your browser window in full-screen mode. Otherwise, the recording will capture the browser or your monitor’s desktop.
- Make sure the microphone is muted. Otherwise, OBS will create an echo effect from the desktop audio and the mic.
- Turn the volume of OBS desktop audio all the way up. Otherwise, the recording will be a bit quieter than usual.
- Don’t move any tabs, windows, mouse cursor, or anything else into the display being recorded. Otherwise, it will also record those things you moved into the screen.
I find it best to use two monitors when recording streaming video in this fashion. That way, you can run OBS on one screen and your video content on the other.
For a few ideas about what to do with recording video streams, see below.
Method #3: Browser Source to Record a Window
And lastly, OBS does have its own browser source built-in. However, it’s impractical for a myriad of situations and has very little practical use.
But, it is how you add Streamlabs alerts and other elements to your video or live broadcast.
Add the Browser Source
Add a new source to OBS.

This time, you’re going to click on, “Browser.”

The Browser source in OBS is usually located near the top of the list when adding a new source to your scene.
Like the methods above, give your browser a name and click, “OK.” In this instance, I’m just going to leave it as “Browser.” I doubt I’ll keep it in the scene, and I’ll tell you why in a moment.

Change Your Settings for the Browser
The settings window for the source will open and provide you with several options.
From here, you can have OBS access a specific website, open a local file from your computer, adjust its resolution settings, or even add your own custom CSS coding.
This is the source you’ll use when adding things like the Streamlabs Alerts window and other widgets for your broadcast or recording. That’s because the URL or file types will not change depending on what you’re displaying.
So, for showing an interactive view of a website, this source is just not a viable option. But, you can still show specific URLs should you choose.

From here, you can enter the URL of the site in question and click, “OK.”
(Optional) Add a Local File to the Browser
However, you can also show something saved onto your computer by clicking, “Local File.” This will change the layout of the settings screen by replacing URL with Local file. Simply browse for the file you want to show.

This is also how you show Twitch followers on your broadcasts.
What Can You Do with the Recordings?
Adding video clips to live streams or recordings can do wonders for content. It adds a layer of action to the content that has greater potential to keep people interested.
In the end, it could increase watch time, engagement, and how often your video is shared on social media.
Ideas when you record the browser window in OBS include:
- Showing viewers how to do something on a website. I often use this when doing WordPress tutorials or demonstrating how to use an online service.
- Using movies, TV shows, news broadcasts, and more as background B-roll for your videos.
- Taking clips from movies to make a point in your content or to add a bit of comedy.
In reality, you’re only limited by your imagination. With so many ways to record streaming video, website usage, or even browser-based gameplay, you can create a long list of content types.
Just make sure you’re not going against any terms of service or copyright laws. In many instances, though, Fair-Usage laws do apply. It just depends on what you’re doing with the recording.
Offer More During Your Videos
OBS is a great platform for a variety of purposes. Although it’s mostly popular for live streaming on gaming websites, I use it exclusively to do video tutorials and freelance writing information.
Using it to record a browser window only adds another layer of engagement for the viewer. Get creative and make something your audience will enjoy.

- Extra Life 2024: Starting My 11th Year of Participation - February 6, 2024
- Review: Is the Sonicgrace Cooling Fan for the Oculus Any Good? - January 11, 2024
- Review: Is Premium Bowling Worth Buying for the Oculus? - February 10, 2023